In-Depth Update with CAKE!

MERRY CHRISTMAS!!!

Wow, it's been nearly two months since I posted anything. At least a few weeks of that I have an excuse. I had an Ulnar Nerve Transposition on my primary arm. That is to say that the major nerve running through my right elbow was being heartily abused, so they removed it from the tunnel it ran through and put it where it couldn't be squished anymore. The problem is that I'm severely right handed. Like, I can barely open a door with my left hand, let alone eat or cook or do DIYs. Sad, but true. So, I've done little else but play the role of supervisor at work and watch cartoons at home.

There were some notable exceptions, however. I had locked myself into making a few cakes prior to my rather quickly scheduled surgery, so with my mother's help (THANKS, MOM!!) and my husband's supervision I managed to turn out three decorated cakes, two pound cakes, and a glazed rum cake. They aren't my best work, but considering the proximity to my convalescence, I'm pretty proud.

First up came literally two days after my surgery. We were hosting a party for the 50th anniversary of our beloved Doctor Who. I'd been talking up the cake I was going to make without thinking about the date. Doh! It turned out a little short (two more layers wouldn't have been amiss) and in the end I didn't get the electronics to work ($13 down the drain at Radio Shack), but the entire thing was eaten in less than 36 hours and a month later people are still mentioning it to me. What was it?


That's right. I did. Be jelly.


It's nine layers of tender white cake, filled with fudge, and decorated with whipped vanilla icing and a few strips of fondant. I don't really like fondant unless I make it myself, otherwise I would have done the whole thing in it for a smoother finish. For a first try on a 3D cake, though, and only my second TARDIS cake ever, I think it came out exceptionally well.

Next up was a birthday cake for my darling Elisabeth from work. She's my little high school protege and I love her to bits. She was turning 17, which is a simultaneously frustrating and splendid age to be! She picked out everything from the shape of the layers to the colors of the icing. The only thing I picked was the flavors of said frosting.


It's red velvet with cream cheese filling and piping, but ermine icing for the outer surfaces. I adore ermine icing. It was the traditional red velvet icing before cream cheese came in and stole the show. It takes more work, but it you once have red velvet cake with ermine frosting you will never be satisfied with another.

Lastly -- for the ones with pictures at least -- was my beloved John's birthday cake. Let's start off with a story: I make cakes for people. That's what I do. If you get a promotion at work, I make you a cake. If you graduate from college, I make you a cake. If it's your birthday, I make you a cake. When I ask what you want for said birthday in the context of food, I am asking what kind of cake you want.

Me:  What do you want me to make for your birthday?
John:  Something that goes good with gravy.
Me:  ... ... ... I'll see what I can do.

Ladies and gentlemen of the internet, I ask of you, do I not love my husband? Do I not listen to his wants and try to ascertain what would best suit his desires? I assert that I do. As proof, I submit to you my crowning achievement of 2013:


Yes, that's right. I made a four layer meatloaf cake, filled with Jack Daniels barbecue sauce, iced in mashed potatoes and decorated with bacon roses. For reference: That's 10 pounds of meat, six eggs, half a bottle of barbecue sauce, a whole box of potato flakes, and an entire pack of bacon. He has subsequently shared it with all his friends and I have been declared best wife ever.

Back on track with the updates, my arm is healing well for the most part, but not where we thought it would be. I was supposed to start work at a bakery at the beginning of the year, but it doesn't look like it's going to work out. I can't lift over a certain poundage, my range of motion is much more limited than before, and I still have shooting pains at the incision site. To top it off, I'm starting to have symptoms in my other arm since I've started relying on it more heavily. Until I know whether I'll need another surgery and until I can frost a cake without having to take a break between layers, it looks I'll continue slogging away in retail and building up my personal ventures.

In less self-centered news, John's new job seems to be going really well. We're keeping our fingers crossed that things continue to work out. We've also made some decisions about house renovation that will hopefully unfold over the next six months or so. Aaaand I have a few furniture projects lined up, as well as a bunch of recipes, and maybe a surprise or three.

All in all, it's been a crazy-crazy 2013, but 2014 is sure to be even crazier. Stay tuned!

Fourth Quarter Cake

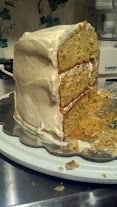
This cake (as many of my cakes are) was made for my husband's homebrew club meeting, more specifically their fourth quarter meeting. It was based around one of the few beers I will actually drink: Blue Moon, though I was informed (loudly but politely) that Blue Moon isn't real beer and the proper name for the cake is a Hoegaarden Cake. Despite the name, this is a non-alcoholic cake that can be served year round. It has the simple honesty of yellow cake, chiffoned for lightness and brightened by a hint of citrus. Even picky eaters love it!

This cake was adapted from smitten kitchen's Best Birthday Cake recipe.

Ingredients:
2 large oranges, zested*
1 tsp. coriander, powdered
4 2/3 cups cake flour
1 Tbsp. baking powder
1 1/2 tsp. baking soda
1 tsp. + 1 pinch salt
18 Tbsp. butter, unsalted
2 1/4 cups sugar
1 1/2 tsp. vanilla extract
5 large eggs
2 1/4 cups buttermilk
1 quart heavy whipping cream
1 cup powdered sugar
white chocolate curls

Directions:
Preheat your oven to 350F. Grease and flour three 9-inch pans. Put a metal mixing bowl in the freezer. Bring butter, eggs, and buttermilk to room temperature.
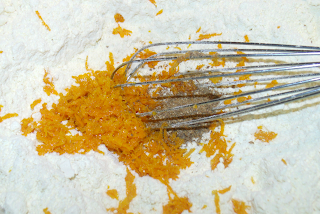
Sift together the flour, baking powder, baking soda and salt in a large bowl. Mix in powdered coriander and the zest of both oranges. Cream the butter and sugar until fluffy. Separate your eggs. Add yolks one at a time to butter, scraping down bowl after every egg. Slowly add in buttermilk just until combined. Don't worry if it looks curdled. In sections of three or more, carefully add in the dry ingredients, again scraping down the bowl after every addition.

In another bowl, beat egg whites until soft peaks form. Carefully fold egg whites into batter, one third at a time, until no streaks remain.

Divide batter evenly among pans and bake for 20-25 minutes or until golden and springy to the touch. Invert layers onto parchment paper to cool.
Remove mixing bowl from the freezer. Pour in the whipping cream and beat until it thickens and begins to leave ribbons behind. Sprinkle in powdered sugar and continue beating just until cream holds peaks. Level each layer and assemble with thickly layered whipped cream icing. Decorate top with a sprinkling of orange zest and white chocolate curls.
* NOTE: The orange flavor continues to develop over time. If you aren't going to serve the cake for a day or two, cut back the orange to only one tablespoon of zest.

Making Old Candles New

My name is Haley and I have a problem: Scented candles. I love them. And I have the misfortune of working at a place that has 24 linear feet of various brands... All of which I get a whopping 40% discount on. It's pretty shameful. John keeps trying to forbid me from buying more and somehow my collection keeps growing anyway. ^_^

I love to decorate with candles. The problem is that many of my favorite scents come in really ugly jars. WoodWick candles are beautifully curvy, Alassais candles are works of art, but Yankee? Oh, Yankee Candle, you break my heart with the silhouette of your chunky, lidded jars!

I can fix it for less than $2.00, though, which is a pittance compared to the price of the candles themselves.

You'll Need:

1 extra long wick
1 tall cylindrical container
1 small saucepan
1 large, ugly candle

Optional Accessories:

1 sandwich bag
1 hurricane vase
36 oz. large grain colored sand
small seashells
#30 jute twine

Instructions:

Take the lid of the candle and put the jar in a saucepan. Fill the pot with water, reaching no more than half way up the candle walls. Turn heat to medium-low and let the wax slowly melt. This takes a while. Like, at least half an hour. I recommend you find something else to do in the interim. Make sure it's something that will allow you to check on the progress frequently. The last thing you want is shattered glass or a ruined pot.
Once the wax is melted (or mostly so) fix up your wick. I bent the top of mine around a spoon, but I've also taped it to the side of a straw in the past. Drop the wick into the new container so that it is centered and the metal base is flush with the bottom, then tie/tape/bend off the top to something to stabilize it.
VERY CAREFULLY pour the melted wax into the new container, reserving some in the old jar. Put the jar back in the pot and set it to the side, but go ahead and turn the stove off. You need to wait a few hours for the wax to begin to set up. As it sets, you'll notice that the top is no longer even. There are dips and peaks and it just doesn't look as pleasant as you probably imagined. That's okay, we can fix that.

Remember the little bit of wax left in the jar? Remelt it once the candle is set up (ie, you can't budge the top layer much with your finger). Then carefully pour the remaining wax onto the candle to level it out. The problem is that, like everything else in nature, wax condenses as it cools. Unfortunately, because it's a pillar of wax and not a sheet, it cools unevenly causing all those ridges. The second application should smooth most of them out. If it's still not to your satisfaction, you can gently press with your finger once the wax is solid but still slightly warm and push and stroke it into the smoothness you want.

Once the wax is fully set, clip the wick down to about an inch or a little less from the top of the candle. with a knife, gently clean up any splashed wax to make a neat presentation. Ta-da! Beautiful, new candle.

You can go a step further like I did with this one and create a display with your new candle. I had a hurricane vase that an aunt gave me years ago as a gift. My guest bath is a little plain since I haven't gotten around to my first renovation yet, so I made a vanity piece for it.
Place the candle in the vase. Put a sandwich bag over the top of the candle. Trust me on this. Don't use saran wrap or tin foil or whatever. Just stick a baggie over it. Pour some pretty, large-grit sand around the candle to about half way up. Pinching either side of the bag, shake the inevitably collected sand in an even motion around the outside. Layer in small seashells about another quarter of the way up the candle. Wrap several layers of jute around the vase and tie in a bow.

For less than $10 (if you already had the original candle and the vase) you've made a new piece of beach-themed art. :-)