Drunken Seafood Linguine

HAPPY NEW YEAR!

A few years ago I did my very first food spread. My ex's mother (HI, MRS. DENISE!) wrote me and told me that the local magazine was looking for a creative local cook. How could I resist? I emailed the editor and a few phone calls later I was producing my very first recipe spread. We've done three now, with a fourth in the planning stages and a few recipes thrown into a Christmas issue, but the first will always be my favorite. It was food made with champagne and wine, and I made the cover:


One of the many dishes I created for the magazine was "Pasta Divina" -- shrimp fettuccine tossed in a creamy mascarpone-champagne sauce. This time I wanted to go a little lighter, a little bubblier, and a little cheaper. I procured seafood one week on BOGO at Publix, and I had most of a bottle of bubbly left from my Christmas ham (also another recipe from this magazine), plus I had stocked up on pasta from a previous week's BOGO, so we were nearly good to go. New Year's Eve seemed like the perfect time to try it out. We'd finally finished off the ham (note to self: 8 lbs is too big for four people), so it was time to ring in the new year with our favorite meal: PASTA.

INGREDIENTS:
  • 1 lb. dry linguine
  • 1 lb. fresh mussels
  • 1/2 lb. large shrimp, shelled
  • 1 large shallot, finely sliced
  • 2 garlic cloves, minced
  • 2 c. brut champagne
  • 4 Tbsp. butter
  • 1/2 tsp. garlic salt
  • 1/4 tsp. white pepper
  • 1 large lemon
  • fresh parsley

DIRECTIONS:
     In a large pan (not pot) which has a lid, melt the butter. Finely slice the shallot and mince the garlic, then saute in melted butter along with garlic salt and white pepper. Pour over champagne and reduce by a third, stirring frequently. Place mussels in the champagne sauce and cover. Steam for 5 - 10 minutes. Toss in the shrimp and leave pot uncovered to cook. In the meantime, boil the linguine noodles to just ever so infinitesimally before they are done. Drain pasta and pour over seafood. Stir so that the pasta can evenly soak up the champagne sauce and finish cooking, and also to distribute and expose the seafood. Chop parsley and sprinkle over pasta before serving. Garnish each serving with lemon slices.

Cheers to you and yours! May 2014 be everything you dream it will be.  :-)

In-Depth Update with CAKE!

MERRY CHRISTMAS!!!

Wow, it's been nearly two months since I posted anything. At least a few weeks of that I have an excuse. I had an Ulnar Nerve Transposition on my primary arm. That is to say that the major nerve running through my right elbow was being heartily abused, so they removed it from the tunnel it ran through and put it where it couldn't be squished anymore. The problem is that I'm severely right handed. Like, I can barely open a door with my left hand, let alone eat or cook or do DIYs. Sad, but true. So, I've done little else but play the role of supervisor at work and watch cartoons at home.

There were some notable exceptions, however. I had locked myself into making a few cakes prior to my rather quickly scheduled surgery, so with my mother's help (THANKS, MOM!!) and my husband's supervision I managed to turn out three decorated cakes, two pound cakes, and a glazed rum cake. They aren't my best work, but considering the proximity to my convalescence, I'm pretty proud.

First up came literally two days after my surgery. We were hosting a party for the 50th anniversary of our beloved Doctor Who. I'd been talking up the cake I was going to make without thinking about the date. Doh! It turned out a little short (two more layers wouldn't have been amiss) and in the end I didn't get the electronics to work ($13 down the drain at Radio Shack), but the entire thing was eaten in less than 36 hours and a month later people are still mentioning it to me. What was it?


That's right. I did. Be jelly.


It's nine layers of tender white cake, filled with fudge, and decorated with whipped vanilla icing and a few strips of fondant. I don't really like fondant unless I make it myself, otherwise I would have done the whole thing in it for a smoother finish. For a first try on a 3D cake, though, and only my second TARDIS cake ever, I think it came out exceptionally well.

Next up was a birthday cake for my darling Elisabeth from work. She's my little high school protege and I love her to bits. She was turning 17, which is a simultaneously frustrating and splendid age to be! She picked out everything from the shape of the layers to the colors of the icing. The only thing I picked was the flavors of said frosting.


It's red velvet with cream cheese filling and piping, but ermine icing for the outer surfaces. I adore ermine icing. It was the traditional red velvet icing before cream cheese came in and stole the show. It takes more work, but it you once have red velvet cake with ermine frosting you will never be satisfied with another.

Lastly -- for the ones with pictures at least -- was my beloved John's birthday cake. Let's start off with a story: I make cakes for people. That's what I do. If you get a promotion at work, I make you a cake. If you graduate from college, I make you a cake. If it's your birthday, I make you a cake. When I ask what you want for said birthday in the context of food, I am asking what kind of cake you want.

Me:  What do you want me to make for your birthday?
John:  Something that goes good with gravy.
Me:  ... ... ... I'll see what I can do.

Ladies and gentlemen of the internet, I ask of you, do I not love my husband? Do I not listen to his wants and try to ascertain what would best suit his desires? I assert that I do. As proof, I submit to you my crowning achievement of 2013:


Yes, that's right. I made a four layer meatloaf cake, filled with Jack Daniels barbecue sauce, iced in mashed potatoes and decorated with bacon roses. For reference: That's 10 pounds of meat, six eggs, half a bottle of barbecue sauce, a whole box of potato flakes, and an entire pack of bacon. He has subsequently shared it with all his friends and I have been declared best wife ever.

Back on track with the updates, my arm is healing well for the most part, but not where we thought it would be. I was supposed to start work at a bakery at the beginning of the year, but it doesn't look like it's going to work out. I can't lift over a certain poundage, my range of motion is much more limited than before, and I still have shooting pains at the incision site. To top it off, I'm starting to have symptoms in my other arm since I've started relying on it more heavily. Until I know whether I'll need another surgery and until I can frost a cake without having to take a break between layers, it looks I'll continue slogging away in retail and building up my personal ventures.

In less self-centered news, John's new job seems to be going really well. We're keeping our fingers crossed that things continue to work out. We've also made some decisions about house renovation that will hopefully unfold over the next six months or so. Aaaand I have a few furniture projects lined up, as well as a bunch of recipes, and maybe a surprise or three.

All in all, it's been a crazy-crazy 2013, but 2014 is sure to be even crazier. Stay tuned!

Fourth Quarter Cake

This cake (as many of my cakes are) was made for my husband's homebrew club meeting, more specifically their fourth quarter meeting. It was based around one of the few beers I will actually drink: Blue Moon, though I was informed (loudly but politely) that Blue Moon isn't real beer and the proper name for the cake is a Hoegaarden Cake. Despite the name, this is a non-alcoholic cake that can be served year round. It has the simple honesty of yellow cake, chiffoned for lightness and brightened by a hint of citrus. Even picky eaters love it!

This cake was adapted from smitten kitchen's Best Birthday Cake recipe.

Ingredients:
2 large oranges, zested*
1 tsp. coriander, powdered
4 2/3 cups cake flour
1 Tbsp. baking powder
1 1/2 tsp. baking soda
1 tsp. + 1 pinch salt
18 Tbsp. butter, unsalted
2 1/4 cups sugar
1 1/2 tsp. vanilla extract
5 large eggs
2 1/4 cups buttermilk
1 quart heavy whipping cream
1 cup powdered sugar
white chocolate curls

Directions:
Preheat your oven to 350F. Grease and flour three 9-inch pans. Put a metal mixing bowl in the freezer. Bring butter, eggs, and buttermilk to room temperature.
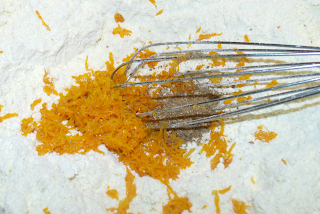
Sift together the flour, baking powder, baking soda and salt in a large bowl. Mix in powdered coriander and the zest of both oranges. Cream the butter and sugar until fluffy. Separate your eggs. Add yolks one at a time to butter, scraping down bowl after every egg. Slowly add in buttermilk just until combined. Don't worry if it looks curdled. In sections of three or more, carefully add in the dry ingredients, again scraping down the bowl after every addition.

In another bowl, beat egg whites until soft peaks form. Carefully fold egg whites into batter, one third at a time, until no streaks remain.

Divide batter evenly among pans and bake for 20-25 minutes or until golden and springy to the touch. Invert layers onto parchment paper to cool.
Remove mixing bowl from the freezer. Pour in the whipping cream and beat until it thickens and begins to leave ribbons behind. Sprinkle in powdered sugar and continue beating just until cream holds peaks. Level each layer and assemble with thickly layered whipped cream icing. Decorate top with a sprinkling of orange zest and white chocolate curls.
* NOTE: The orange flavor continues to develop over time. If you aren't going to serve the cake for a day or two, cut back the orange to only one tablespoon of zest.

Making Old Candles New

My name is Haley and I have a problem: Scented candles. I love them. And I have the misfortune of working at a place that has 24 linear feet of various brands... All of which I get a whopping 40% discount on. It's pretty shameful. John keeps trying to forbid me from buying more and somehow my collection keeps growing anyway. ^_^

I love to decorate with candles. The problem is that many of my favorite scents come in really ugly jars. WoodWick candles are beautifully curvy, Alassais candles are works of art, but Yankee? Oh, Yankee Candle, you break my heart with the silhouette of your chunky, lidded jars!

I can fix it for less than $2.00, though, which is a pittance compared to the price of the candles themselves.

You'll Need:

1 extra long wick
1 tall cylindrical container
1 small saucepan
1 large, ugly candle

Optional Accessories:

1 sandwich bag
1 hurricane vase
36 oz. large grain colored sand
small seashells
#30 jute twine

Instructions:

Take the lid of the candle and put the jar in a saucepan. Fill the pot with water, reaching no more than half way up the candle walls. Turn heat to medium-low and let the wax slowly melt. This takes a while. Like, at least half an hour. I recommend you find something else to do in the interim. Make sure it's something that will allow you to check on the progress frequently. The last thing you want is shattered glass or a ruined pot.
Once the wax is melted (or mostly so) fix up your wick. I bent the top of mine around a spoon, but I've also taped it to the side of a straw in the past. Drop the wick into the new container so that it is centered and the metal base is flush with the bottom, then tie/tape/bend off the top to something to stabilize it.
VERY CAREFULLY pour the melted wax into the new container, reserving some in the old jar. Put the jar back in the pot and set it to the side, but go ahead and turn the stove off. You need to wait a few hours for the wax to begin to set up. As it sets, you'll notice that the top is no longer even. There are dips and peaks and it just doesn't look as pleasant as you probably imagined. That's okay, we can fix that.

Remember the little bit of wax left in the jar? Remelt it once the candle is set up (ie, you can't budge the top layer much with your finger). Then carefully pour the remaining wax onto the candle to level it out. The problem is that, like everything else in nature, wax condenses as it cools. Unfortunately, because it's a pillar of wax and not a sheet, it cools unevenly causing all those ridges. The second application should smooth most of them out. If it's still not to your satisfaction, you can gently press with your finger once the wax is solid but still slightly warm and push and stroke it into the smoothness you want.

Once the wax is fully set, clip the wick down to about an inch or a little less from the top of the candle. with a knife, gently clean up any splashed wax to make a neat presentation. Ta-da! Beautiful, new candle.

You can go a step further like I did with this one and create a display with your new candle. I had a hurricane vase that an aunt gave me years ago as a gift. My guest bath is a little plain since I haven't gotten around to my first renovation yet, so I made a vanity piece for it.
Place the candle in the vase. Put a sandwich bag over the top of the candle. Trust me on this. Don't use saran wrap or tin foil or whatever. Just stick a baggie over it. Pour some pretty, large-grit sand around the candle to about half way up. Pinching either side of the bag, shake the inevitably collected sand in an even motion around the outside. Layer in small seashells about another quarter of the way up the candle. Wrap several layers of jute around the vase and tie in a bow.

For less than $10 (if you already had the original candle and the vase) you've made a new piece of beach-themed art. :-)

Custom or IKEA?

I've long admired all these DIY bloggers I follow. Many of them aren't afraid to roll up their sleeves and custom build themselves something they long for. In theory, I'm not either. I can roll up plans and measurements with the best of them. But executing those plans is another story. I'm strangled by fear of screwing up and wasting tons of money. I'm also hampered by the cost of getting someone else to build my plans professionally. Suddenly, this morning I cast my thoughts to a post I've been enamored with by Kenz over at IBK.

Why not take something with the bones you want and make it into what you need?

And wouldn't you know there's an IKEA just over the state line in Atlanta, Georgia? :-)

Now, this is a lucky turn of events for us. It would cost us about $60 in gas to drive my dad's truck there and back. Why is that lucky? Because shipping to our house would cost twice as much as the actual product! Try a minimum of $199 the last time I calculated. However, despite the savings I definitely don't want to make the trip more than once, so I'm measuring and plotting and planning exactly what I'll need.

There will be seams where all the pieces fit together. That can't really be avoided. And I hate the idea of all those little holes running down the insides for "adjustable" shelving. Before we spend any big bucks, I'm going to get a few brands of white filler putty and see how well they cover and how much it'll take. Then, of course, I'll have to run moulding around the crown and base to give the pieces a more solid look.

I've actually already figured out that I can build a five-cabinet media and book shelf over our couch for about $150. Not too shabby, eh? I think the kitchen "bar" project is going to cost quite a bit more, probably around $400. I know that sounds like a lot (it is!), but it would easily cost three times that to pay someone to build it and only slightly less than that were I to do it myself.

Here's some of the products I'm thinking of mixing and matching:
RATIONELL Shelf IKEA 25-year Limited Warranty. Read about the terms in the Limited Warranty brochure.AKURUM Wall cabinet frame IKEA 25-year Limited Warranty. Read about the terms in the Limited Warranty brochure.
AKURUM High cabinet frame IKEA 25-year Limited Warranty. Read about the terms in the Limited Warranty brochure.BENNO DVD tower IKEA Adjustable shelves can be arranged according to your needs.
Of course, I'm still looking through their vast catalog. There's so many sizes and shapes to choose from to make exactly what I need. Have you ever done an IKEA hack? Have you ever taken a piece of furniture and turned it into something else?

Lemon Layer Cake

It's pretty frustrating when you know you want to make a cake, but the recipes out there are all for a different kind of cake. When you search for lemon cake recipes, you'll inevitably come up with a ton of pound cakes, loaf cakes, sheet cakes, icebox cakes, gooey bars, and even a cocktail or two. The layer cakes I found were generally referred to in the comments as "dense" and that wasn't something I wanted either. However, as usual, I waited until the day before and didn't have time to experiment. That being said, I found a recipe that looked like it would take the minimum amount of tweaking and ran with it.

My source's source called the (now twice altered) recipe a "Robert E. Lee Cake." I'm not sure why. As an historian it interests me, though you might think it's silly. Did he have a particular predilection for lemons? Perhaps it was a Yankee slur in regards to the cake's color. Either way, it's pretty delicious! I'll probably post another version at some point and call it a "Southern Lady Cake" because I want to make it a chiffon and perhaps add another fruit (coconut, maybe?) as well as Swiss meringue for the frosting.

Ingredients:

1 cup unsalted butter
2 cups sugar
1 large lemon
4 large eggs
2 3/4 cups all purpose flour
2 1/2 teaspoons baking powder
1 teaspoon baking soda
3/4 teaspoon salt
1 cup buttermilk
1 teaspoon vanilla extract
1 can lemon pie filling
frosting of choice

Directions:

Bring butter, eggs, lemon, and buttermilk to room temperature.

Preheat oven to 350F. Grease and flour three 9-inch round cake pans.

In a large bowl, sift and whisk together the flour, baking powder, baking soda, and salt. Zest the lemon and add into a mixer with butter and sugar. Cream the butter mixture. Add one egg at a time, beating until each is incorporated. Squeeze the lemon. In a small cup, mix together two (2) tablespoons of lemon juice, the vanilla, and the buttermilk.

Add 1/3 of the flour mixture.
Add 1/2 the buttermilk.
Add 1/2 the remaining flour mixture.
Add all of the remaining buttermilk.
Add all of the remaining flour mixture.

Remember to scrape down the bowl between each addition. Mix just until incorporated so that the cake doesn't get tough. Pour into the prepared pans. Spread the mixture evenly, then rap each pan on the counter several times to release any air bubbles.

Bake for about 25 minutes, or until the tops are golden brown and a cake tester comes out clean. You may need to rotate your pans a time or two throughout for even cooking. My new oven gets quite hot at the back and would have overcooked one of the layers if I hadn't been paying attention.

Place the layers in the freezer for 15-20 minutes, or until cool. Dollop half of the lemon filling onto the first layer and smooth it out the best you can, all the way to the edges. Place the second layer and repeat. Place the third layer on top and use part of the icing to create a crumb coat. Put the cake in the refrigerator for 15 minutes or so, just until the frosting begins to set up but is still tacky. Finish icing and decorating the cake. Put in a cake box or the like and store in the refrigerator until and hour or so before time to eat (to take the chill off).

I was running behind, so I used "whipped" buttercream frosting from a can for the outside. It was still delicious and very easy, but I'll be posting how to make both real lemon curd and, as previously mentioned, Swiss meringue icing, which would have been best (in my opinion) for the exterior.

DOWNLOAD THE RECIPE CARD

Ultra-Fudge Brownies

What better way to celebrate moving into a new house than by baking brownies? This is my super-special, ultra-fudge brownie recipe. Everyone tells me that my recipes are awesome, but this is my favorite. It's the most chocolatiest, yummiest, nummiest brownie you'll ever eat, but it's so rich that you'll probably only eat one. I put most of the ingredients together in layered jars for Christmas gifts in 2011, and they went over really well. At the bottom of the post I'll explain how.

You'll Need:

  • 1 cup butter, unsalted
  • 9 ounces dark chocolate
  • 3 large eggs
  • 1/2 teaspoon salt
  • 1 1/2 cup white (caster) sugar
  • 1/2 cup dark brown sugar
  • 2 teaspoons vanilla extract
  • 1 cup all-purpose flour
  • 1 cup cocoa powder

Preheat your oven to 350F. Grease a 9-inch by 13-inch pan. If you have a problem with baked goods sticking, dust the grease with a little bit of cocoa powder.

Whisk together the eggs, salt, both sugars, and vanilla. In a microwave safe bowl, melt chocolate and butter on medium power. Check every 30 seconds. Stir until smooth. Alternatively, you can use a bain-marie (double boiler), but this is faster. Once the chocolate is smooth, slowly add it to the egg mixture, whisking constantly. Be careful not to let the heat of the chocolate turn everything into scrambled eggs! Dust in the cocoa powder and continue stirring. Do the same with the flour until fully incorporated. Pour the batter into the prepared pan and beat against a solid surface to release air bubbles and settle brownie mix. Bake for 35 minutes, or until a toothpick comes out clean.

To make this into a gift, first procure a 1-quart mason jar and a pretty square of fabric that is at least 2 inches longer in each direction than the diameter of your lid. Into the CLEAN jar, carefully spoon the flour. On top of that -- in order -- spoon: Cocoa powder, white sugar, and brown sugar. Pack everything down as needed between layers. Drizzle the vanilla on top of the brown sugar. If you have room (I didn't) put the chocolate on top of that and seal the jar with the fabric trapped between the lid and the rim. If you don't have room for the chocolate, wrap it tightly in saran wrap and then place it in a pretty mesh or organza bag that can hang from the neck of the jar. Include instructions that specify the need for eggs and butter.

DOWNLOAD THE RECIPE CARD!

DOWNLOAD THE GIFT CARD!

Print the recipe card on a 4" x 6" unlined index card. Print the gift card double-sided on a 3" x 5" unlined index card. Or use pretty cardstock of similar dimensions.

Air Conditioning Woes

I've always maintained that Alabama was meant for plants, not people. Between the rain, the heat, and the bugs there's no way man was intended to live here.

Yesterday our air conditioner broke. Yes, our brand new, two week old air conditioner.

In the morning we noticed it was a little warm, but we keep the thermostat high to save power. However, when I was in the kitchen I could feel that there was hardly any air coming out of the vent. With a little investigation we discovered that the last three vents on the duct line were not blowing even though the registers were wide open.

At first we assumed that meant something was knocked loose under the house. After all, the first five vents were working fine. We turned on a few fans to compensate and figured I'd make a warranty call in the morning. But as the day went on it became painfully obvious that something was wrong with the air conditioner itself. The house was getting hotter despite our best efforts. John stuck his fermentation thermometer over a working vent. Even blowing as hard as it could the air was reading at 87F degrees, the same temperature as outside. This trend continued into the night, which is the only thing that made it bearable in that the external temp dropped to 72F. Running constantly, the A/C unit and available registers were able to cool the whole house to 78F by 6AM. Of course, it was back to 82 by 10AM.

As soon as was seemly, I called the company we bought the house from to see what they'd do and how fast. I know they're sick of hearing from me about all the million little things that I think aren't being done fast enough or aren't being done right, but I assure you that it isn't nearly as sick as I am of calling them. Don't get me wrong. They're great people who bent over backwards to help us get a nice home at an affordable price, but my socialization skills and patience are wearing thin.

By 11:30AM they'd sent out a heating and cooling guy. Turns out, there wasn't enough Freon in the system. He said it's pretty rare, like getting a half-charged battery in a pack, but that sometimes they systems that come pre-put-together for homes like ours don't get the "charge" they need before leaving the factory. He checked everywhere inside and out for leaks just to make sure and topped us off.

As far as the vents went, he said he saw some ice collecting, and that because of the way the ducts have to bend under the house, if a clump of ice was blocking it it would cut off the air flow. I was a little incredulous as to how ice could get in our ducts on a 90 degree day, but apparently it's a legitimate thing. The coils freeze up, condensation builds up in the duct bend, that freezes up, and before you know it the whole thing stops working. He fixed it, though. By noon the ice was beginning to melt, the air pressure was slowly but surely increasing and the cats were much, MUCH happier.

The gentleman that came out was kind enough to take me around and show me what all the pipes do and how to tell if it's freezing up again. I like learning all this stuff about our house. I may not can fix it, but at least I can tell someone what's wrong next time!

Brown Butter Banana Bread

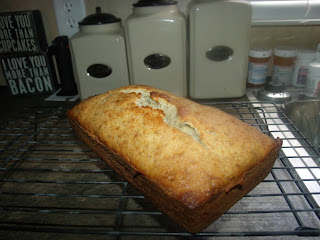
My mother had some bananas she'd forgotten about and was about to throw them out. They were black, and the skin gave just by the pressure of holding them. The aroma coming off of them was so banana it was almost artificial. But in the back of my mind I remembered something Alton Brown said once. He talked about how for banana nut bread you needed very, VERY ripe bananas -- basically anything short of fuzzy. I snatched them up and toted them home with me.

And then they sat on my counter for another three days as I insisted I was going to make bread. I think by yesterday even my stalwart John was becoming skeptical they'd end up as anything but garbage.

But today, fighting a broken A/C, waiting on the trim man again, unpacking more boxes, I stopped and said, "I am going to make that bread."

((You may also hear me refer to this as Minion Bread because I'm slightly obsessed with Despicable Me. I'm so excited: They're making a Minions Movie for release next Christmas!!))

Ingredients:

  • 2 cups all-purpose flour
  • 2 large eggs
  • 1 stick unsalted butter
  • 1 cup sugar
  • 4 overripe bananas
  • 1 teaspoon vanilla extract
  • 1 teaspoon salt
  • 1 teaspoon baking powder
  • 1/2 cup chopped nuts

Directions:


Set the eggs out on the counter and preheat the oven to 350F. Grease and flour a loaf pan.

In a small saucepan, melt butter over medium high heat. Once completely melted, stir gently but constantly until foam begins to turn a deeper golden-tan color but not actually brown. Remove from heat and pour into a bowl to stop the cooking process. I'm sorry I didn't get any pictures of this part, but a fabulous explanation of the process can be found HERE. Allow the butter to cool.

Mash the bananas and the sugar together until almost a liquid.


Crack the eggs into the cooled butter and whisk together with salt and vanilla extract.


Whisk the butter mixture into the sugar-banana goop. Sift together the flour and baking powder. Add it to the wet ingredients, taking care not to over beat.


Fold in the nuts if you want them. You could put up to a full cup, though I usually prefer half a cup. Any type of nut is fine, though walnut is more traditional. Since this is usually a spur of the moment bread for me, I end up using sliced almonds a lot because I always have those on hand. Chopped pecans are great, too.

Pour the batter into the loaf pan and bake for 50-60 minutes, or until a cake tester comes out (mostly) clean. Remove from the oven and allow to cool for 15 minutes before removing and allowing to cool on a cookie rack.


If you wanted to get even fancier than browned butter, replace the vanilla extract with the scraped out seeds and insides of a vanilla bean. For a nuttier flavor without the nuts, try replacing 1/2 the flour with whole wheat flour.

To download the 4x6 recipe card, CLICK HERE.

French Toast Casserole

Ingredients:

  • 10 slices bread
  • 8 large eggs
  • 1/2 cup milk
  • 1/8 cup sugar
  • 1 teaspoon ground cinnamon

Directions:

Preheat oven to 350F.

Cut or tear bread into small pieces. I cut mine into nine equal cubes. I also used old, stale bread. This is the perfect way to use it up before it gets rock hard or moldy. Grease a casserole dish and toss the bread pieces in. As you can see from the picture I made two casseroles, one to eat and one to freeze.


In a large bowl, whisk together the eggs, milk, sugar and cinnamon. Whisk well to break up any clumps in the cinnamon and to break up the albumin of the eggs.


Pour egg mixture evenly over bread. Gently mix bread to completely coat in the mixture.


Cover dish with aluminum foil and bake for 30 minutes. Uncover and bake for an additional 20-30 minutes, until bread has risen and egg mixture is fully cooked.


Makes 5-6 servings.

To download the 4x6 recipe card, CLICK HERE.

Welcome Home

It's been a busy few weeks. Heck, it's been a busy few months. August is here and we're very nearly completely moved in. I'm still decorating, of course. And most of the furniture for the man cave hasn't made its way over yet since John's hand is stitched up. He's out of commission when it comes to furniture for another month. However, we are living here full time and have even been entertaining guests.

The project for today really completed things. Apparently the postmaster had a word with my dad about the fact that we still didn't have our mailbox up. Oops. So, that's what we did this morning. Many thanks to John's dad for digging through all that gravel! We weren't overly sure what the regulations were, so we haven't cemented it into place just yet. Once we're sure this is where it's going to stay, we'll make it more permanent and I'll plant some lovely climbing flowers around the base. Suggestions for plants are welcome in the comments section.

Speaking of plants, I also intend to plant a river birch between the front door and the master bedroom windows, opposite the cedar tree. My hope is that, much like at my parents house, the tree will quickly shoot up and shade the front porch. Our house faces west and in the evenings the front door becomes burning-hot -- not something pleasant to come home to. I'm doubly excited because river birches are one of my favorite types of trees. Much better than pine trees. :-)

Hospitals and Hospitality

We're all a little preoccupied at the moment, so there may be no new updates for a few days. John's in pre-op now for carpal tunnel surgery. It's outpatient, but the healing time puts the kibosh on any two-person projects for a while.

Also, our very first niece was born last night. Seven pounds, nineteen inches! It's very exciting. Though I have been informed that she has been given tons of Disney Princess stuff already. :-P

And finally, my "older sister" is staying with us for a few nights. She just got back from two weeks in Thailand with our aunt and uncle and their family. I'm sure we'll have tons of catching up to do once she recovers from jet lag.

Tiny, less exciting updates about the house include: The skirting has been put on, but it's the wrong color. I had specifically requested dark brown or black, but I came home to blinding white. Luckily I plan to plant fast growing bushes around the perimeter. And if I get really sick of it, there's a paint for that. There's also a few interior problems with the house that they're going to have to come out and fix (like the fact that the bathroom door won't latch), but for the most part it's live-in ready. We did discover that the washing machine no longer works after its stint in the barn, so we're having to cart clothes back and forth to my parents' house. Now comes the decision about whether to buy a new one or pay to have it fixed.

All in all, it has been and is going to continue being a busy week. I'll update when I have something more substantial -- preferrably with pictures.

Things I've Learned Today

1) Contact paper smells really bad.

2) Microsoft likes to punish you for not routinely updating your XBOX by making it take forever when you do.

3) There is no such thing as "cry it out" when it comes to cats. They have infinite vocal power and stamina.

4) Never put duct tape on wood furniture, especially if you don't plan to remove it any time soon.

5) There is a 3M Command Strip for every occasion.

6) Valances can give the illusion of taller windows. Drapes can give the illusion of wider windows. Both are necessary in a manufactured home.

7) Working three jobs has more disadvantages than otherwise.

This Is Just To Say

William Carlos Williams is my second favorite poet of all time. His words are often simple, but they stir evocative imagery. One of his most famous poems is "This Is Just To Say," a sweet and good-humored piece of found poetry one might imagine he wrote to his wife Florence. Despite the playful nature of the poem, I have always associated it with theft. Any time I hear of something being stolen, the opening lines run through my head.

The air conditioning guys showed up this morning while we were trying to move some furniture before work. They went into the master bedroom, came back out, checked every room, went back into the master bedroom, and cursed.

"What's wrong?"
"There's a box that has all our copper tubing and wires in your bedroom there."
"Okay...."
"It's empty."

This is just to say
I have eaten
the plums
that were in
the icebox

Luckily, the company we bought the house from isn't going to charge us for new copper. I've tried my hardest to keep an eye on things, but with so many people going in an out over the last week, there's no telling what happened. I'd like to believe they just accidentally put an empty box in the house, but I'm not that naive.

The head air conditioning guy ran into town to get some more from the hardware store on the housing company's dime, while the other guy started setting everything up. Soon we should have A/C. Now if only we had clean water.

Quick Update

There isn't a lot to report and even fewer pictures. The rain has been pretty bad and it's pushed some things back. We do have siding, and as of today the inside has been trimmed out to join up all the pieces of the house. The trim guy even vacuumed the house for me. Isn't he sweet?


Monday night we were all excited about moving in Wednesday (today). We even had a picnic. We put down a blanket, stole some fake flowers from my mother, and ate take-out Chinese off our fine china while drinking WalMart wine from our wedding crystal... While watching Star Trek on the laptop perched atop a few boxes. The latter was merely to test the strength and stability of our new internet connection, I assure you. >.>


The new timeline dictates that we should have clean water and air conditioning by the end of the week. The problem is that we both work two jobs each on Fridays and 12 hour shifts on Saturdays. It looks like we'll be moving in at the beginning of next week. In the meantime, I'll be making small runs of things as I can, just to have that much less stuff when the big move happens.

Stay tuned!

Power Up

At about 6:45 this morning our local electrical cooperative showed up with their trucks and a pole. At 8:00 I'm going to call the electrician and see when he can get out here. This is so exciting! At this rate we can probably move in by Wednesday.

They are coming off my parent's pole and running the lines down to our house. Here's a terrible shot of them working from my dad's office door. As a reference for those of you that attended our wedding, this is the tree that many of the reception tables were under with the fairy lights. They also had to cut down yet another sassafras tree. Man, those things are everywhere! But I still don't hate them as much as pine trees.


We had seen a water authority truck out by the road last week and stupidly I assumed that meant they were putting in the water meter LIKE THEY SAID THEY WOULD. I mean, come on guys. I paid you nearly $1500 a month ago. When I called them week before last they said they'd be out Monday. When I called them Wednesday they said they'd be out later that day. What little patience I was struggling to scrape together is GONE. Not only is there no water hook-up, but because I assumed that there was without going to inspect whether an actual hole had been dug, I scheduled Mr. Jones to come back out and put out my water lines. So, there's a few more phone calls I have to make.

And apparently our home didn't actually come with cable outlets, so I have to call the provider back and tell them to let their boys know to bring out extra parts this afternoon. I hope they don't charge me for that. At this point, the amount of money we've paid out for the "little things" is beyond ridiculous.

UPDATE:  The electricians have come and gone. They were really fast, didn't track mud everywhere, and most importantly didn't mind explaining things to me as I took lots of pictures. That last picture is the hole in the fuse box where the main wiring was threaded up from the crawl space.


The water authority also came out immediately after I told them I'd be getting our lawyer involved if I didn't see progress today. It's been a month already, and there were only three houses ahead of us. The installation process itself only takes 3-4 hours. I understand that it's been raining, but there's been more than enough sunny days to make this timeline unacceptable.

When they got here I noticed that they were just sitting in the ditch not doing anything. I went out and talked to one guy and he said that the telephone people were supposed to have come out and marked where the lines were so that the backhoe didn't clip them. He said, "They should have been out here by now. We called them two weeks ago." I looked him dead in the eye and said, "Yes, sir. I understand. I paid you guys FOUR weeks ago and I still don't have water."

The short of it is that half an hour later the telephone guy was spray painting the grass and the backhoe is now happily digging up our neighbor's yard. Looks like I'm baking a lot of cakes this month!

Together At Last

About an hour ago the guys left for the last time. Yes, all the pieces of our house are together at last.

First they finished shoring up the foundation with a combination of cement bricks, wood blocks, and steel beams. This house isn't going anywhere. Then they hooked up all my "black" water lines to the septic tank. Mr. Jones will have to come back out next week and dig a trench from the meter to the house and then lay pipe to hook up my "fresh" county water.


We're still waiting on a power pole. Once that's in place, the electrician said he would move around whatever he had to to come out immediately and hook us up. Between that, the fact that he called to check on us this morning, and him being the only person willing to give me an estimate on labor and price-per-foot, means that out of a two page list of numbers the power company gave me he gets my money. That's how you do business in a small town.

In the meantime, someone that the crew ambiguously referred to as "the trim guy" is supposed to come out and finish everything off. The north and south sides need siding, a few doors and screens need to be put in place, and the seams where the pieces of the house meet need to be fully joined and finished off. He'll also be the one installing our A/C. Rainy or not, south Alabama can creep upward of 90F in July and August. They say he could come as soon as this afternoon or as late as Monday, and it could take him up to two days to complete everything.


There may be no new updates for a few days (well, maybe a recipe) so here's a sneak peek shot of the interior to hold you over. See you soon!